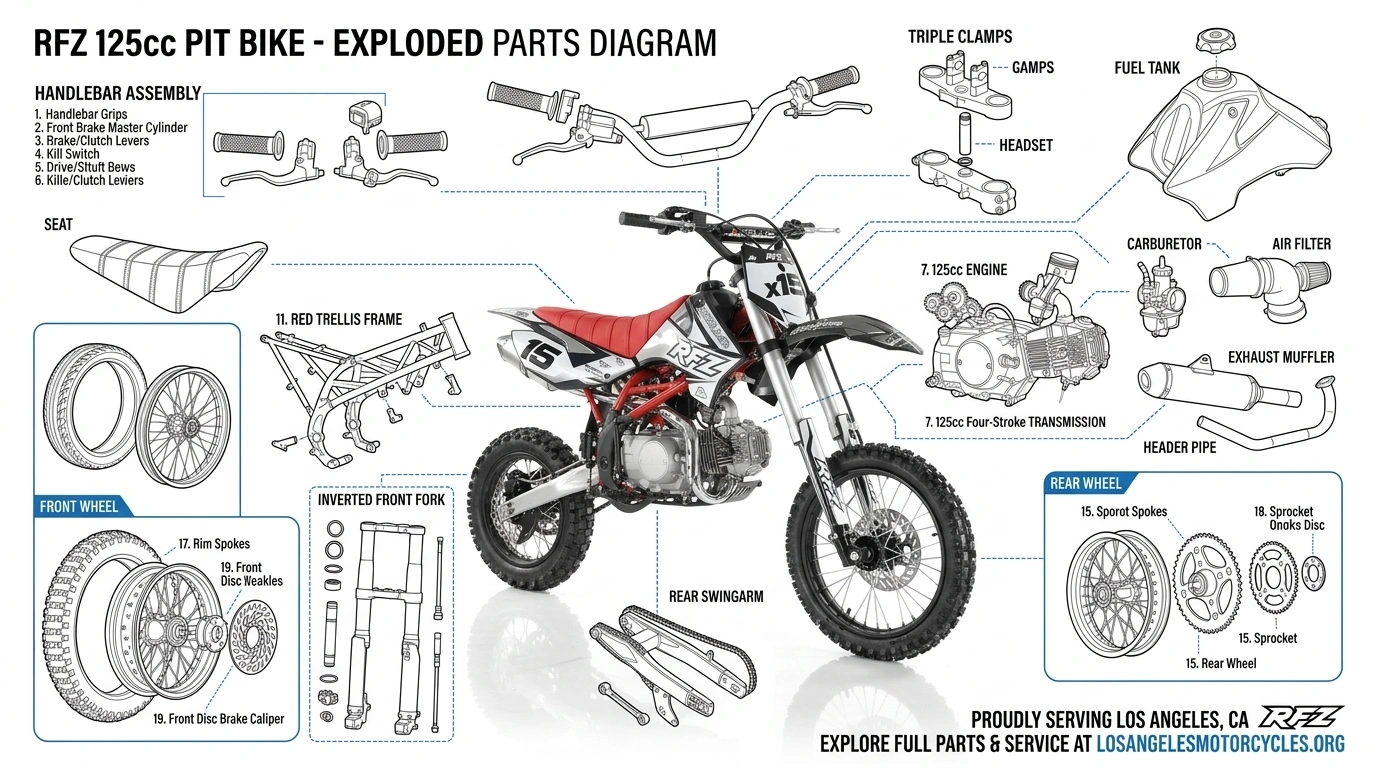
A 125cc dirt bike is a simple machine. The engine is small, the systems are straightforward, and the maintenance intervals are short — but they matter more on a Chinese platform than on a Japanese one. This guide covers every basic maintenance task for a 125cc dirt bike, how often to do it, and what to watch for. If you own an Apollo, Boom, or similar 125cc platform in Los Angeles, this is the maintenance baseline.
For parts and in-house service for 125cc dirt bikes in Los Angeles, FE Motorsports at 2916 S Santa Fe Ave stocks common wear items and handles service for every platform they carry — open 7 days a week.
Why Maintenance Matters More on Chinese Platforms
The 125cc pit bike engine used in Apollo, Boom, and similar bikes is a mature, well-understood design. It’s been in production long enough that every failure mode is known. The bikes that develop problems are almost always the ones that aren’t maintained — oil not changed, air filter neglected, chain left dry and loose. Maintained correctly, these engines run reliably for years. Skipped, they don’t.
The maintenance intervals on Chinese 125cc platforms are shorter than on larger Japanese bikes. Where a Honda might call for an oil change every 600–1,000 miles, a 125cc pit bike engine benefits from oil changes closer to every 300–500 miles. The engine is smaller, the oil volume is smaller, and it degrades faster under use.
Engine Oil — The Most Important Job
Oil is the single most critical maintenance item on any small engine. Neglected oil is the leading cause of premature engine wear on 125cc dirt bikes.
What oil to use: 10W-40 motorcycle-specific oil. Do not use automotive oil — the additive package is different and can damage the clutch. Look for oils labeled “MA” or “MA2” which are formulated for wet-clutch motorcycle engines.
How much: most 125cc pit bike engines take approximately 0.8 to 1.0 liters. Check your specific model’s owner manual. Don’t overfill — overfilling causes foaming which is as damaging as running low.
How often: every 300–500 miles for regular riding, or at least once per season if you ride infrequently. If the oil comes out black and gritty, you waited too long. Fresh oil is amber-colored and translucent.
How to do it: warm the engine for 2–3 minutes first (warm oil drains more completely), place a drain pan under the drain bolt on the bottom of the engine, remove the drain bolt and the oil fill cap, let it drain completely, replace the drain bolt with a new crush washer, fill with fresh oil, check level with the dipstick.
Air Filter — Second Most Important
A dirty air filter starves the engine of air, richens the fuel mixture, and causes poor performance, hard starting, and accelerated wear. After riding in dusty OHV conditions — Gorman, Jawbone Canyon, Dove Springs — the air filter should be inspected every ride and cleaned as needed.
Most 125cc dirt bikes use a foam air filter. Cleaning process: remove the filter, tap out loose dust, wash with mild soap and water or dedicated filter cleaner, rinse thoroughly, allow to dry completely, re-oil with filter oil (a light coat — not saturated), reinstall.
Never run without an air filter — even for a short test ride. Unfiltered air carries abrasive particles directly into the engine.
Replace the filter when it’s torn, deteriorated, or no longer holds its shape after cleaning.
Spark Plug — Cheap Insurance
The spark plug on a 125cc engine should be inspected every 10–15 hours of riding and replaced every 30–50 hours or once per season, whichever comes first.
What to look for on inspection: a healthy plug has a light tan or gray electrode. Black and sooty means the mixture is running rich (could be a dirty air filter or carb issue). White or blistered means the mixture is running lean or the engine is overheating. Wet with fuel means the engine is flooded or the choke is stuck.
Use the correct plug specification for your engine — don’t substitute a random plug. The correct spec is in the owner’s manual or on the plug currently installed. FE Motorsports stocks the correct spark plug specification for the Apollo and Boom 125cc platforms.
Drive Chain — Adjust and Lubricate
The drive chain is one of the most neglected items on dirt bikes. A loose chain slaps the swingarm, wears the sprockets unevenly, and can derail at speed. A dry chain wears quickly and causes premature sprocket wear.
Chain tension: with the bike on a stand, the chain should have approximately 1–1.5 inches of slack at the midpoint between the sprockets when you push up and pull down. Too tight causes excessive load on the transmission output shaft bearing. Too loose causes slapping and derailment risk.
How to adjust: loosen the rear axle nut, use the chain adjusters on each side of the swingarm to move the rear wheel back (tightening the chain) or forward (loosening), ensure both sides are adjusted equally so the wheel stays straight, retighten the axle nut to spec.
Chain lubrication: after every ride, or at minimum every 3–4 rides, apply chain lubricant to the chain while slowly rotating the rear wheel. Use motorcycle-specific chain lube — not WD-40, which is a cleaner and evaporates quickly rather than lubricating.
Replace the chain and sprockets together when the chain is stretched beyond adjustment range or the sprocket teeth are hooked or worn to points. FE Motorsports stocks drive chains and sprockets for the 125cc platforms they carry.
Brakes — Check Before Every Ride
Brake check before every ride takes 10 seconds and catches problems before they become emergencies.
Front brake: squeeze the lever — it should feel firm and engage well before it reaches the handlebar. Soft or spongy feel means air in the line or low fluid. If it reaches the bar, the brake is unsafe to ride.
Rear brake: press the pedal — same check. Firm engagement, doesn’t go to the floor.
Brake pads: periodically inspect the pad thickness through the caliper. Most calipers have an inspection window or the pads are visible from the side. Replace pads before they wear to metal-on-metal. FE Motorsports stocks brake pads for the Apollo and Boom 125cc platforms.
Brake fluid: hydraulic disc brakes use DOT 4 fluid in most 125cc applications. Check the reservoir level periodically. Low fluid usually means worn pads (the caliper pistons extend further as pads wear, taking fluid volume). If fluid is low and pads are thick, inspect for leaks.
Carburetor — The Common Problem Source
The carburetor is the most common source of running problems on 125cc dirt bikes, especially on bikes that sit for extended periods. Fuel left in the carburetor evaporates and leaves behind varnish deposits that clog jets and passages.
Prevention: if the bike will sit for more than 2–3 weeks, turn the fuel petcock to OFF and let the engine run until it stalls. This empties the carburetor float bowl and prevents varnish buildup.
Symptoms of a gummed carburetor: hard starting, rough idle, stumbling under acceleration, engine dying at low RPM.
Basic cleaning: remove the float bowl (one screw at the bottom of the carb), spray carb cleaner through the jets and passages, reinstall. For stubborn cases, the entire carburetor may need to be removed and soaked.
The Boom Vader uses a specific carburetor that most shops cannot source. FE Motorsports carries the original Vader-specific carburetor in Los Angeles — the correct fitment that restores easy starting and smooth running.
Coolant — Air-Cooled Engines Don’t Have It
Most 125cc pit bike engines are air-cooled. There is no coolant system to maintain. The engine relies on airflow over the cylinder fins to dissipate heat. This means two things: don’t idle the engine for extended periods without airflow, and don’t cover the cylinder fins with mud or debris.
If your specific 125cc bike is liquid-cooled (some higher-end models are), check the coolant level in the reservoir before each ride and replace coolant per the manufacturer’s interval.
Pre-Ride Check — 60 Seconds Every Time
Before every ride:
- Check tire pressure (soft tires are a handling and safety issue on dirt)
- Check chain tension and look for obvious dry spots
- Squeeze both brake levers to confirm firm feel
- Check fuel level
- Start the engine and listen for unusual sounds before loading the bike or heading to the trail
This takes 60 seconds and catches most problems before they strand you at the trail.
When to Bring It In
Some jobs are straightforward for a home mechanic. Others benefit from a dealer with the right tools and platform knowledge:
Do it yourself: oil changes, air filter, spark plug, chain lubrication and adjustment, brake pad inspection.
Bring it in: internal clutch work, brake bleeding, carburetor rebuilds if cleaning doesn’t resolve the issue, any electrical diagnosis, valve adjustments.
FE Motorsports at 2916 S Santa Fe Ave, Los Angeles handles in-house service for every platform they carry — Apollo, Boom, Vitacci. Turnaround is days, not weeks. Open 7 days a week including Monday. Call (323) 588-6634.
For parts to do the job yourself, FE Motorsports stocks oil filters, spark plugs, brake pads, drive chains, sprockets, clutch cables, and the hard-to-find Vader-specific carburetor. See the full Boom Vader parts guide at FE Motorsports for the complete Vader-specific parts list.
For more on choosing the right 125cc platform in Los Angeles, see our guide to Youth Dirt Bikes in Los Angeles and Chinese Powersports in Los Angeles — Why Budget Riders Choose It.
Leave a Reply